Workshop detail header
Original field notes

Mechanical Bitcoin movement,

The Bitcoin Watchmaker publishes original build logs, machining experiments, movement-design notes, and technical lessons from developing a mechanical watch inspired by Bitcoin.

This archive is the primary record: direct observations from the workshop, long-form write-ups, and ongoing research into horology, CNC, tooling, and Bitcoin-native complications.

Page 4 of 10. Showing 10 of 96 posts.

2025/04/12 16:55 UTC
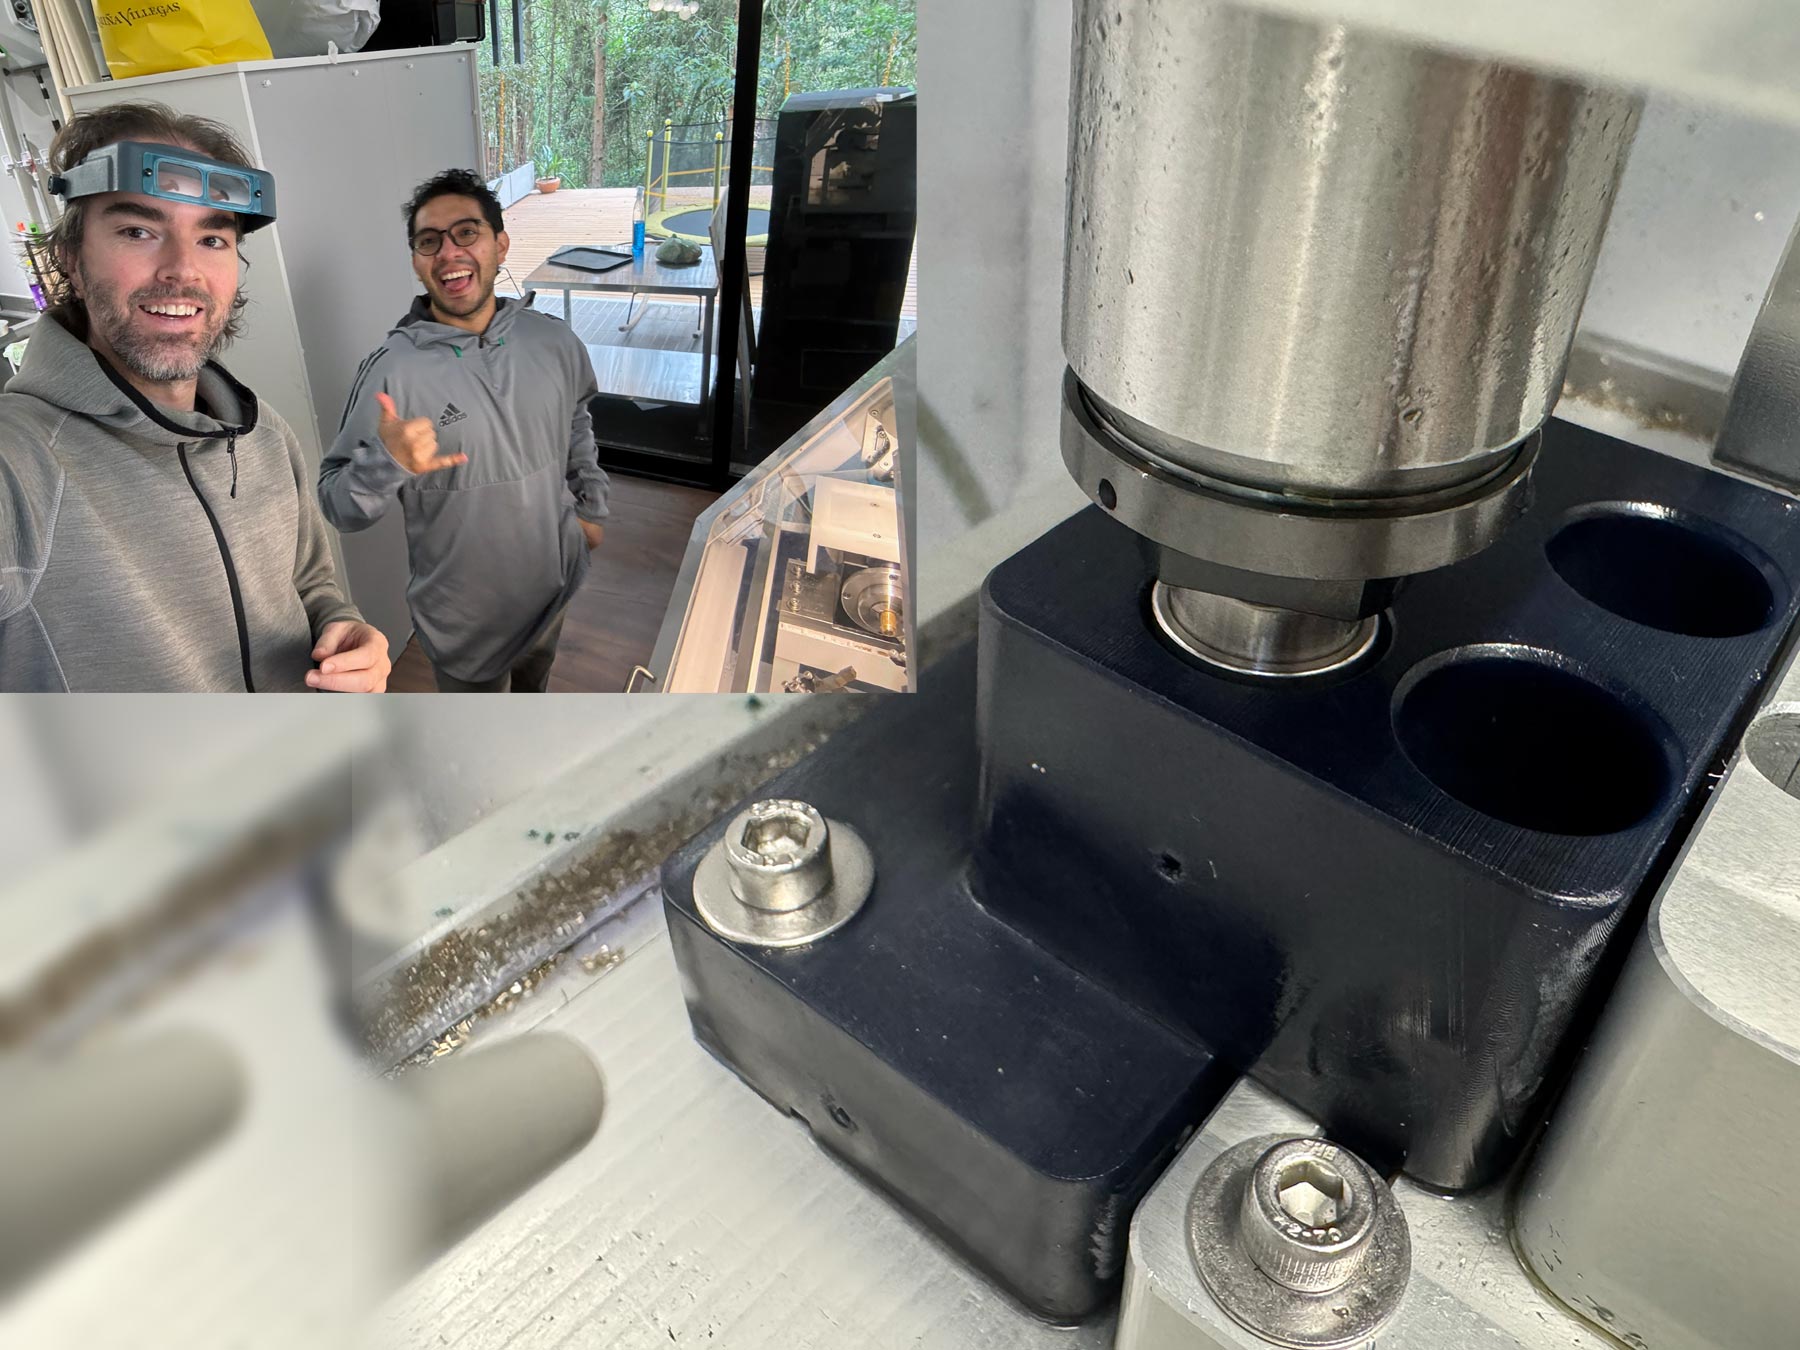
TLDRUsing new fixtures for my 50x50mm stock has revolutionized my workflow by boosting precision and consistency, especially for multi-pass setups. Big shout-out to Paul from Roysdon Watch Co. for sharing the fixture files and Dimitri from NSCNC for sending some fixtures along with the machine. It's incredible how the right tools—and people—can transform your process! 🙌
Show more Show less

Fixture Game Changer—Thanks Paul! 🙌

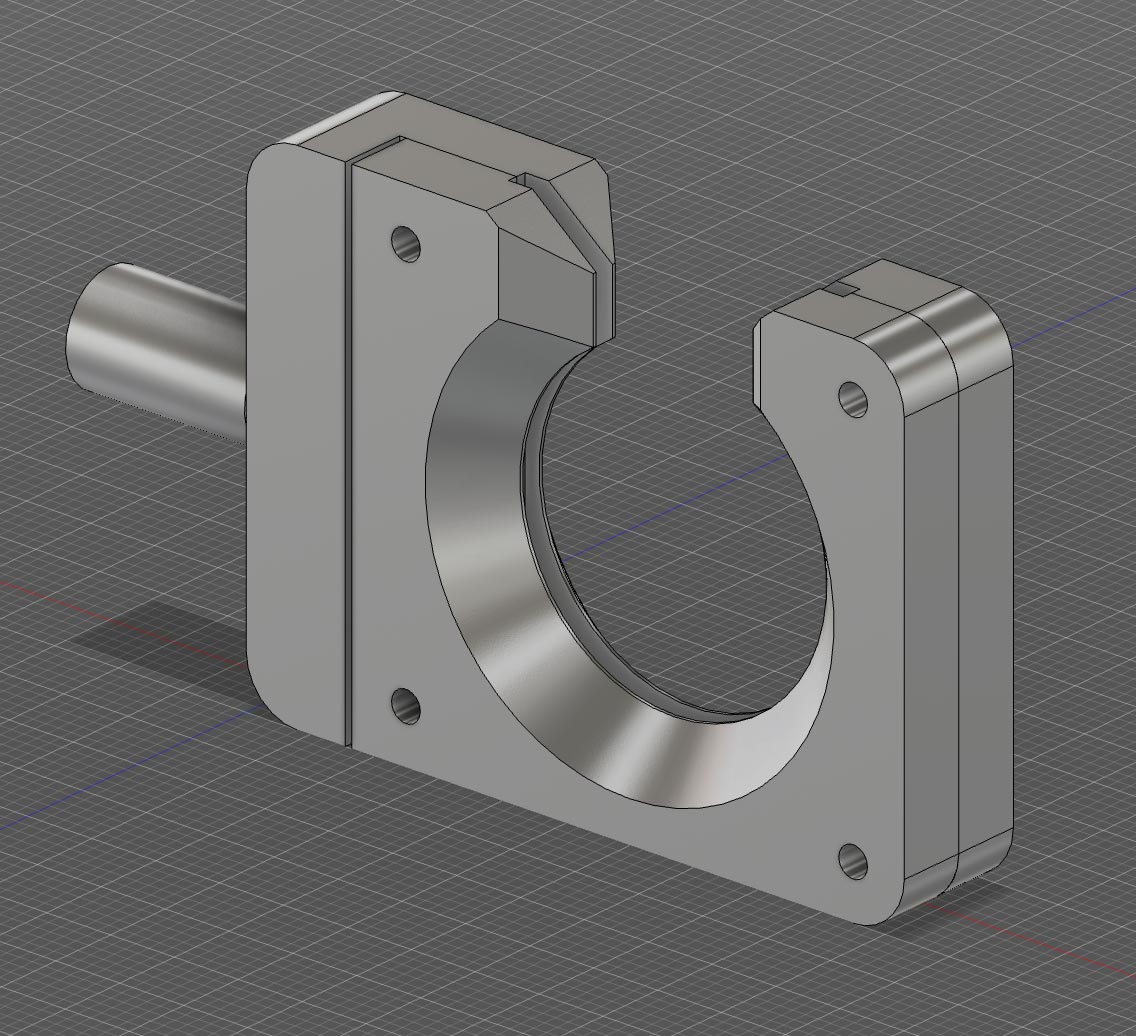
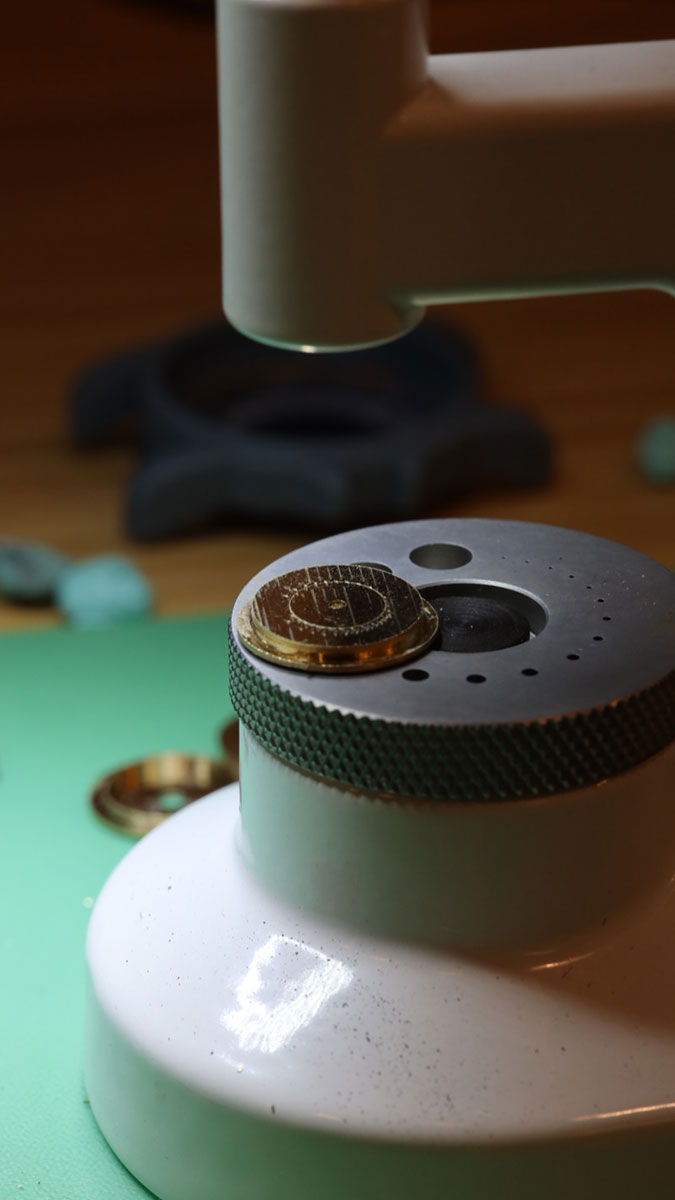
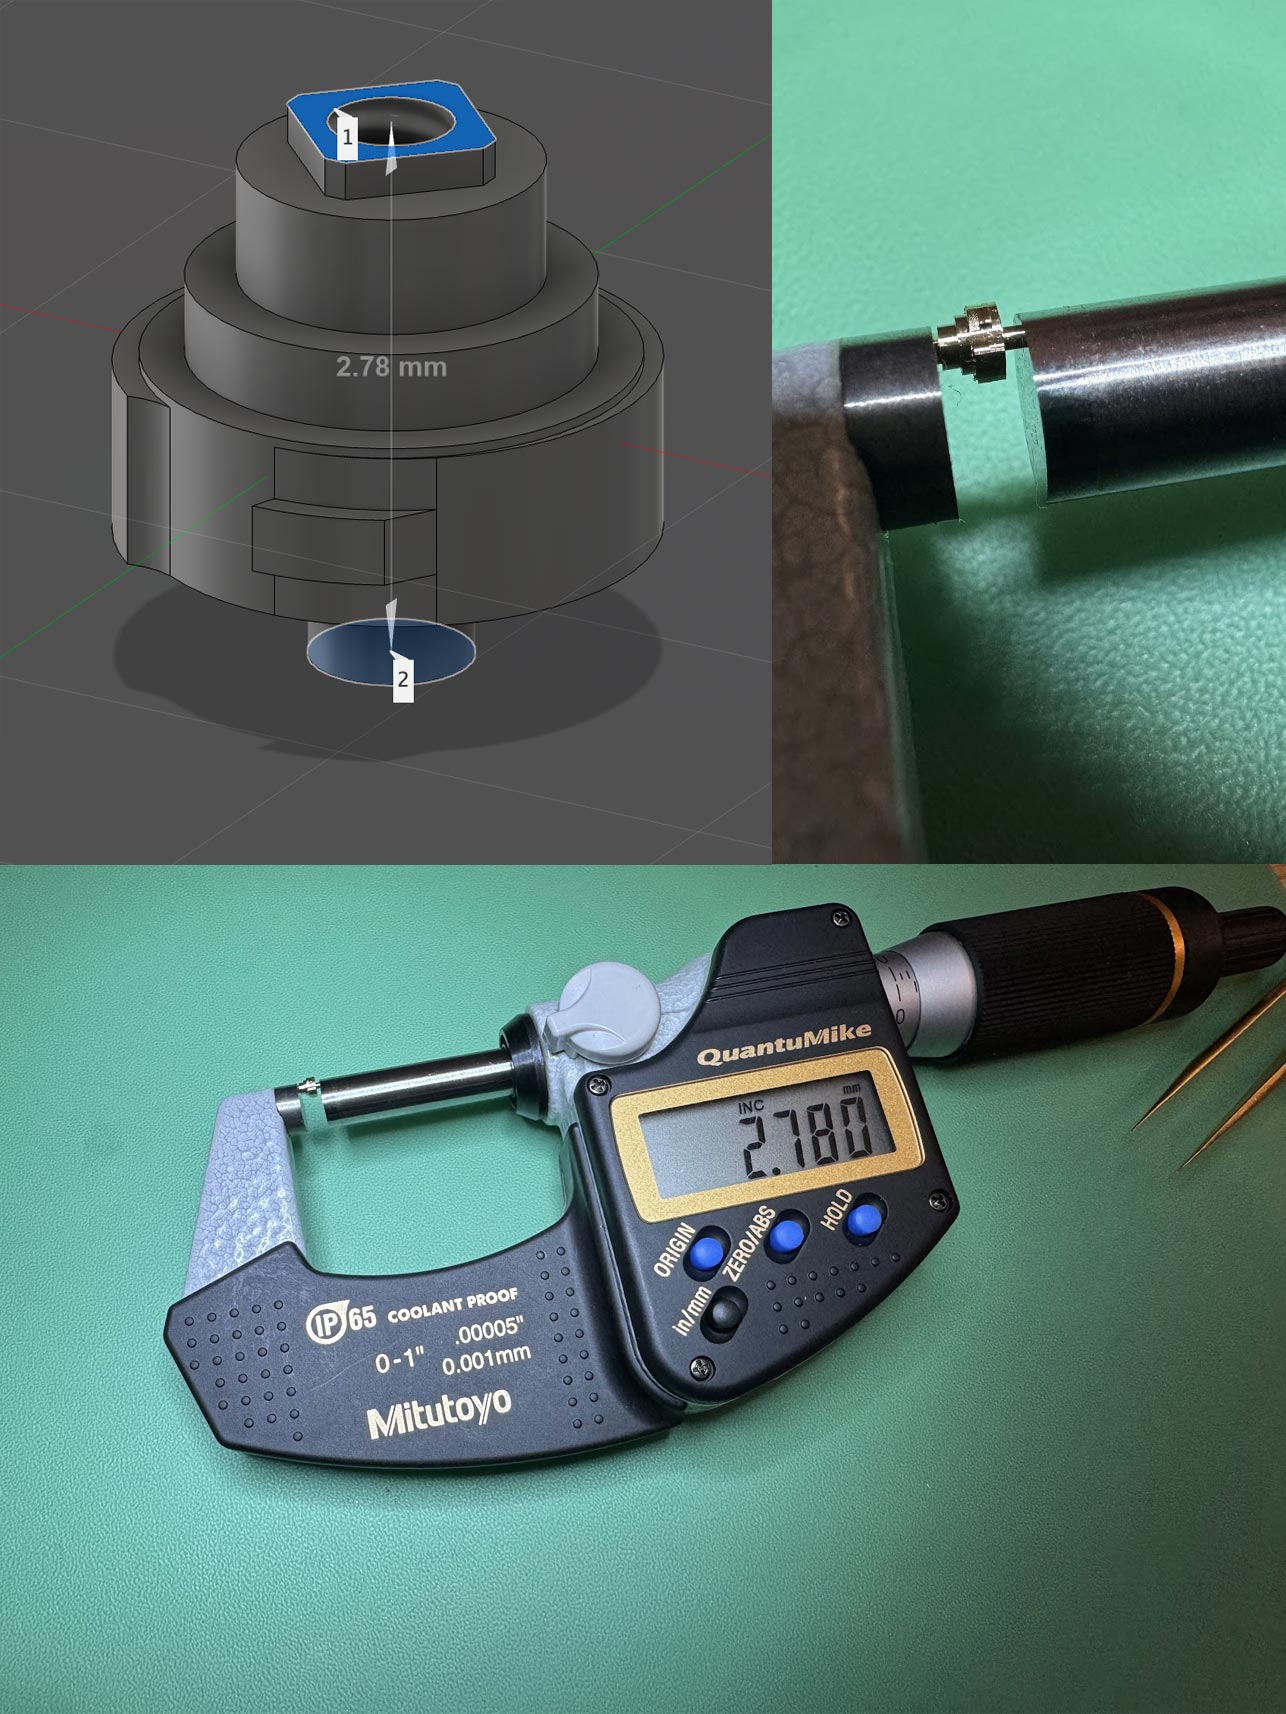
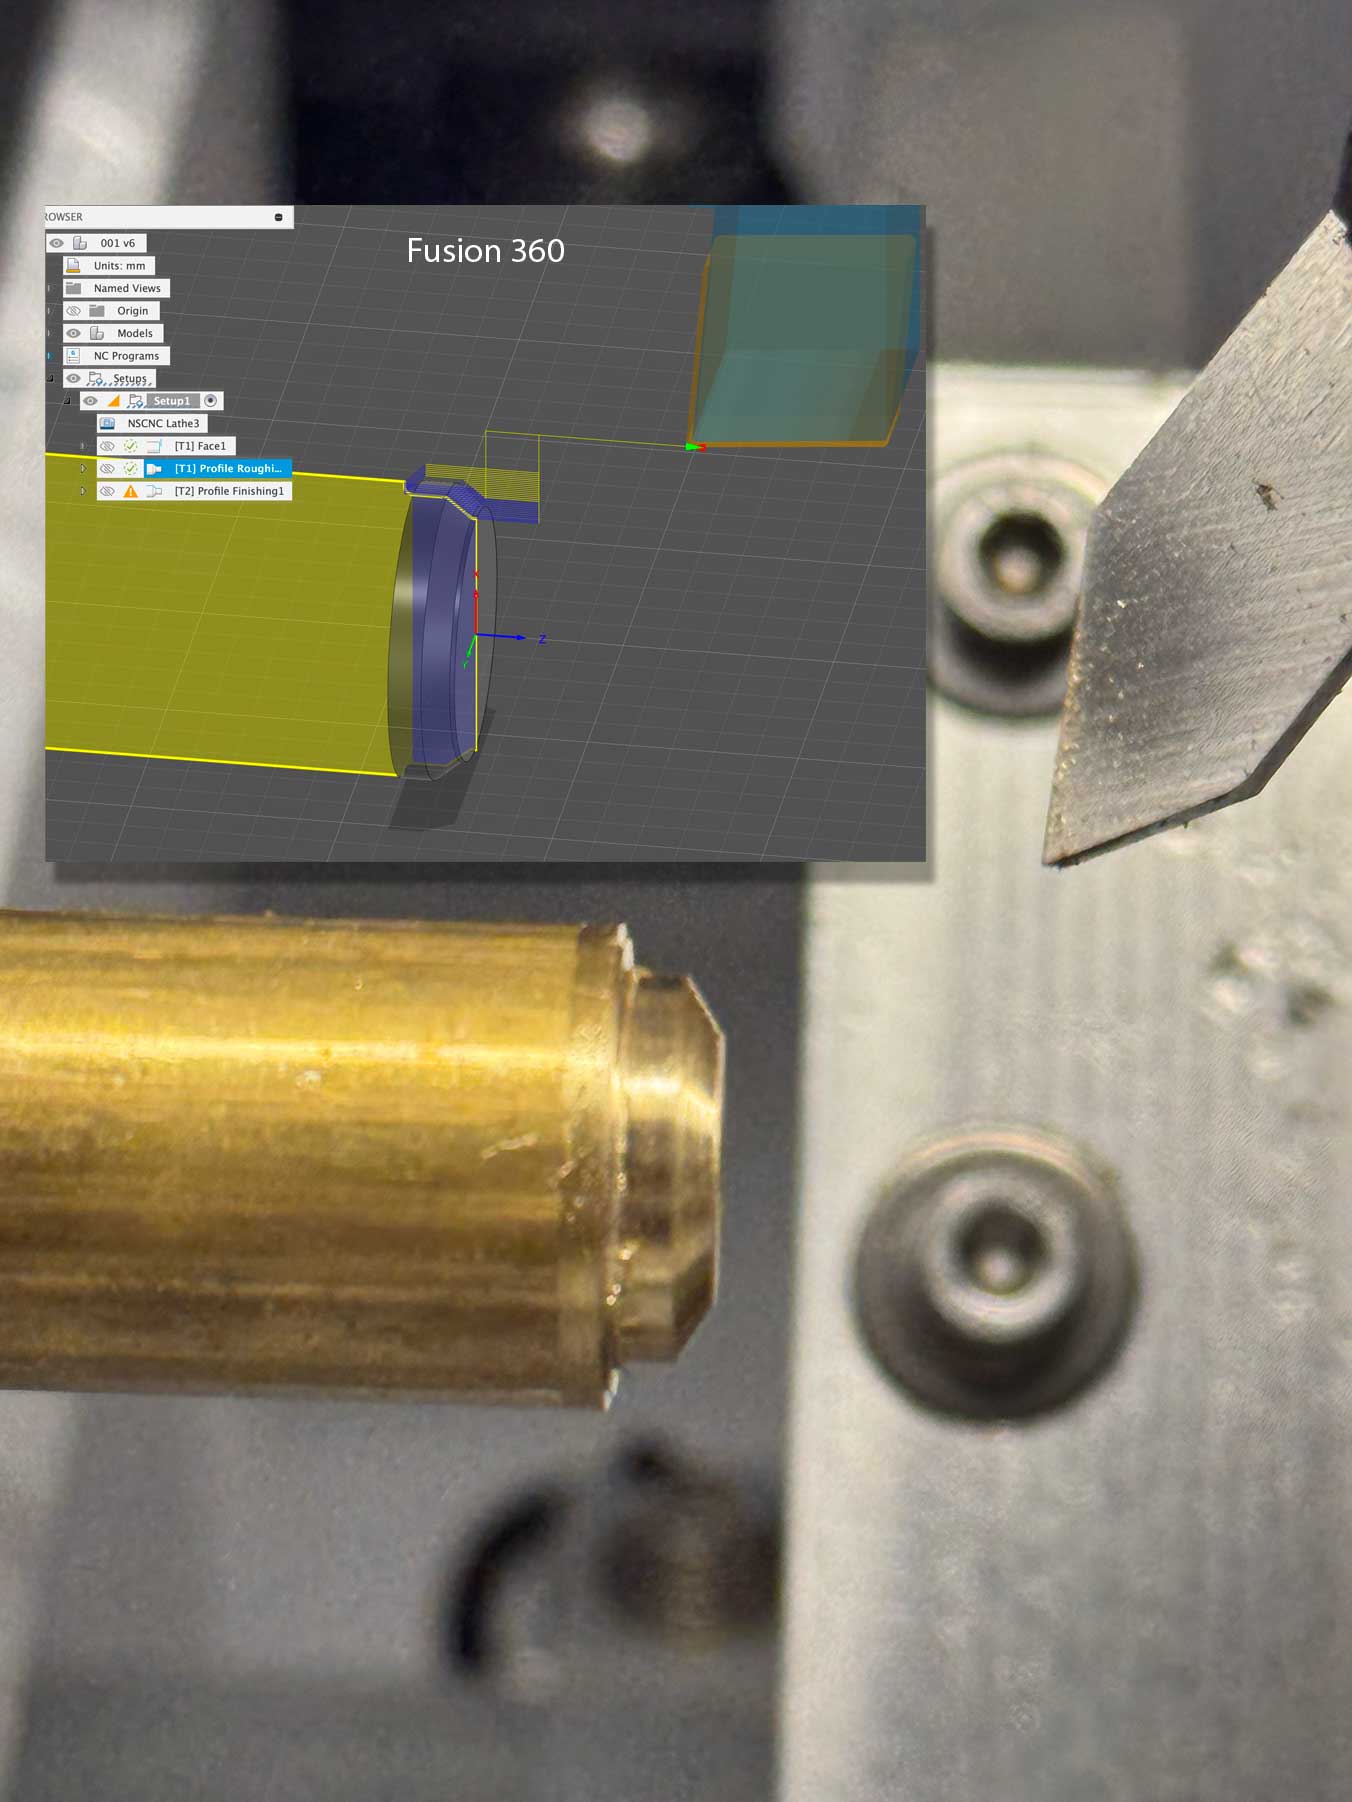
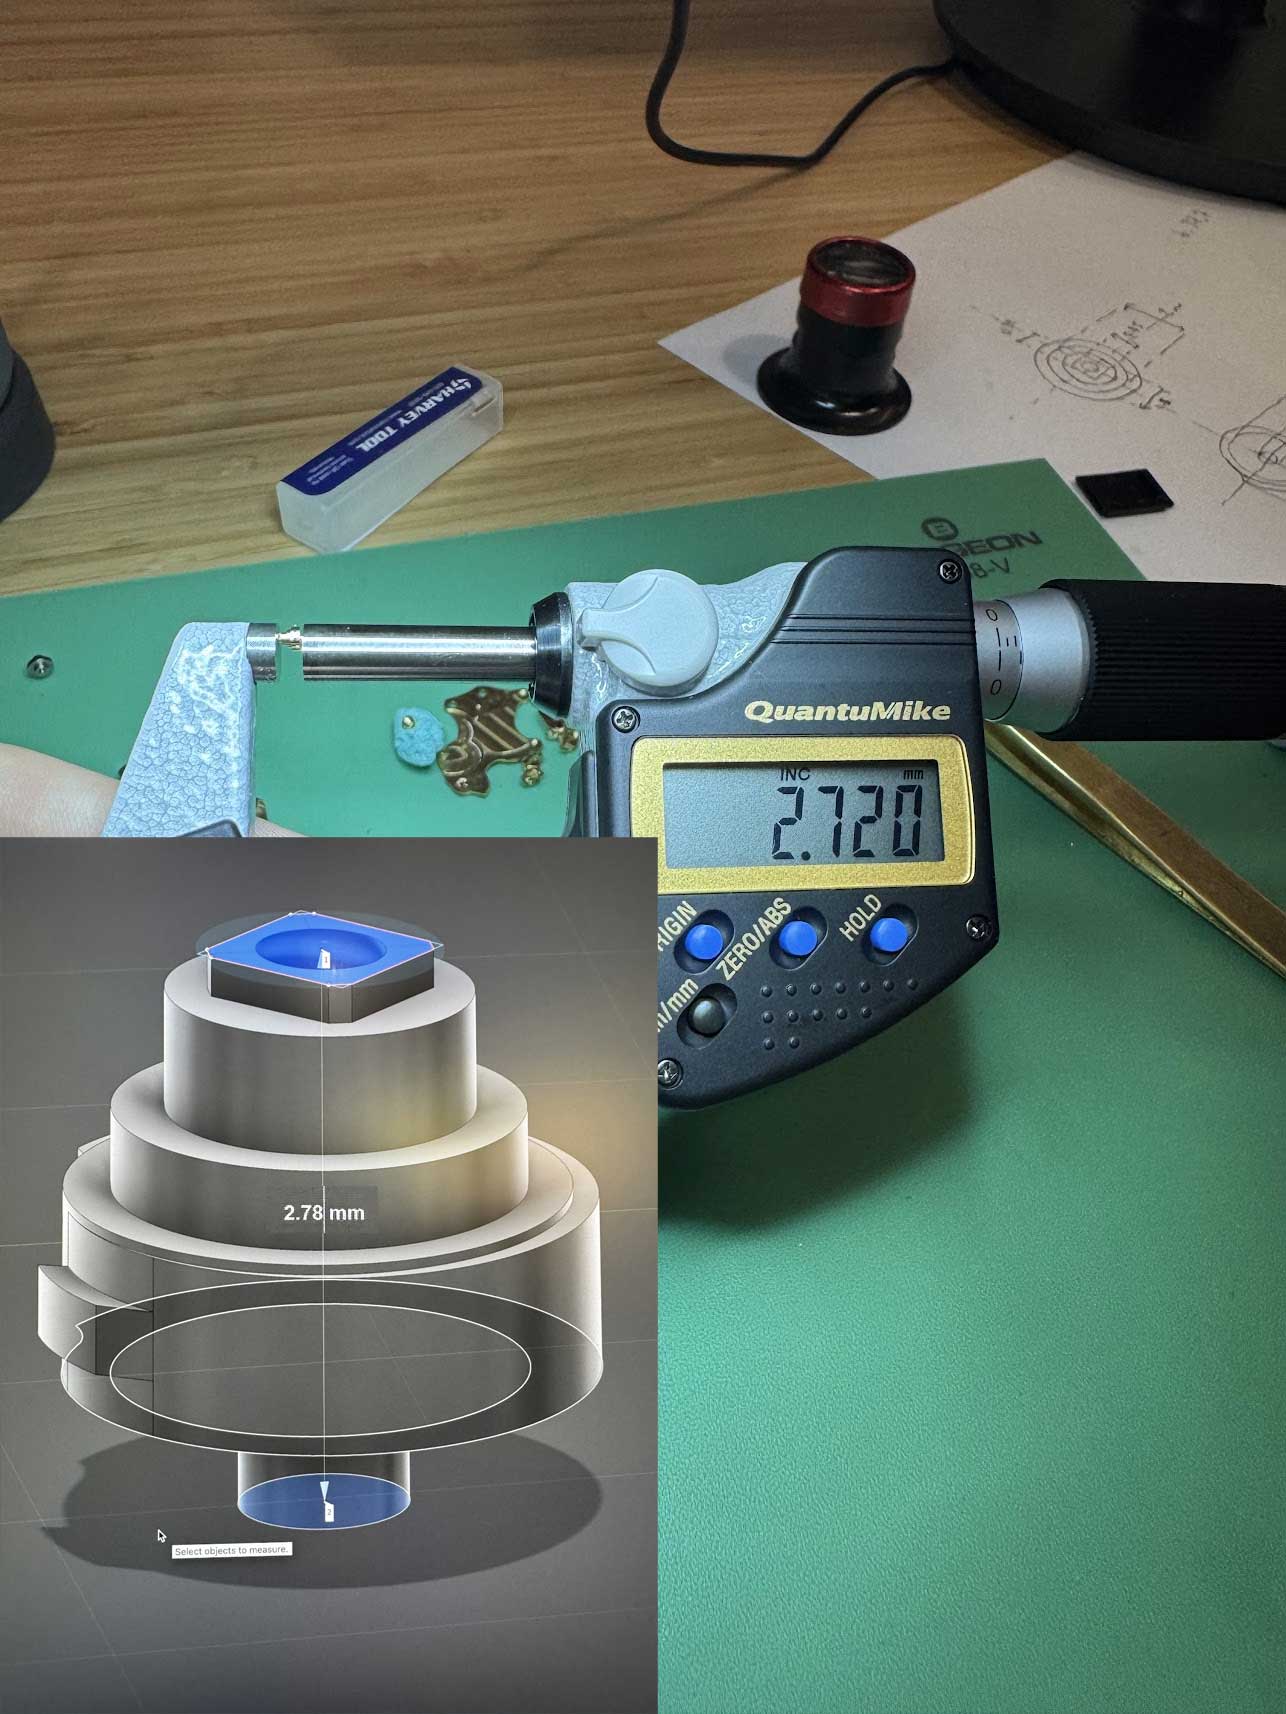
Using these fixtures that hold 50x50mm stock—in 3.175mm, 3mm, or 2mm thickness—has been an absolute lifesaver. They've brought much-needed consistency and precision to my workflow, especially for multi-pass setups. 🔧

Huge thanks to Paul from Roysdon Watch Co. for generously sharing the fixture STEP files, and also to Dimitri from NSCNC as he sent a few fixtures with the machine. 🙏

It’s amazing how the right tools—and the right people—can make such a big difference. This setup has leveled up my machining process in a huge way!


sketch

Read standalone post

2025/04/08 10:40 UTC
TLDRThe mainspring barrel is finally shaping up after several milling attempts, with each iteration bringing us closer to a precise, functional part. It's been rewarding to see the geometry and fit come together, though there's still some refining ahead. 🚀 If you're into craftsmanship or watchmaking, this is where the magic happens!
Show more Show less

Mainspring Barrel In Progress! 🔧

Today we worked on the full mainspring barrel—straight off the machine after a rough pass! It’s been a journey of 4–5 milling attempts to fine-tune tolerances and polish the details, but wow, it’s starting to look amazing. 😍

Each iteration gets us closer to a precise and functional part. Seeing the geometry come together with proper fit and finish is incredibly satisfying. Still some refining left, but it’s definitely coming to life!

Onward to the next steps! 🚀


sketch sketch sketch

Read standalone post

2025/04/04 10:40 UTC
TLDRAlexis just upgraded my Elara machine to hold 10 tools, thanks to his custom expansion adding 4 extra slots. This means smoother multi-tool jobs with less manual swapping, making room for more creativity. Alexis didn't just help out; he seriously leveled up my workflow, and you can check out his artistic side on Instagram too! 🙌🚀
Show more Show less

Tool Expansion! Huge Thanks to Alexis 🙌

Big shoutout to my friend Alexis, who during his visit made something absolutely awesome—a custom expansion that adds 4 extra tool slots to the Elara! 😍

That means I can now hold a total of 10 tools on the machine. WOW. This is going to make multi-tool jobs so much smoother, with less manual swapping and more room to experiment and refine. 🛠️

It’s always amazing when friends lend a hand and leave behind something that levels up the entire workflow. Thanks again, Alexis—this is a game changer! 🚀

Check his insta here (He's also a super talented artist)


sketch

Read standalone post

2025/04/03 13:55 UTC
TLDRBig news: The Elara machine has reached 2 micron precision on all axes, meaning it's perfectly tuned for creating intricate parts like watch components. This was achieved by solving alignment issues when rotating parts, ensuring the Z and Y axes align perfectly with the A axis. Now, they're ready to start producing high-precision components. 🚀
Show more Show less

2 Micron Precision Achieved! 🎉

WOW! It’s so exciting!!! We finally reached 2 micron precision on the Elara—across all three axes: X, Y, and Z! 😱

This has been a huge goal, and hitting this level of accuracy means we’re officially ready to start making parts. Every axis is now dialed in, stable, and repeatable—exactly what’s needed for micro-mechanical work like watchmaking. 🔧

The breakthrough came from fixing a tricky issue: since we’re using the A axis to mill, the part is milled, then rotated 180 degrees and milled again. That means the Z and Y axes must be absolutely centered to the A axis. Any offset—even just a few microns—causes a massive misalignment when the part is flipped. 😬

Now that the setup is truly centered and locked in, we’re ready to move forward. Time to bring some real components to life! 🚀

sketch

Read standalone post

2025/03/28 15:06 UTC
TLDRI've been diving into the NSCNC Lathe3 and it's been a steep learning curve, thanks to a lack of initial configuration. Setting up Mach4, tweaking Fusion 360, and modifying post processor code have all been necessary steps to get things running smoothly. While there's still a lot to master, especially clean cuts and tool centering, each experiment is a step closer to precision. 💪
Show more Show less

Finally Back—Learning the Lathe the Hard Way

Wow, it’s been a while since my last post! I’ve been deep in the trenches learning how to use the NSCNC Lathe3, and let’s just say—it hasn’t been plug-and-play. 😅

The manufacturer didn’t send it fully configured, so I had to learn how to set up Mach4, tweak post processor code, and fine-tune Fusion 360 just to get accurate results. It’s been intense, but I’m slowly getting there.

Still a lot to learn—especially when it comes to centering tools and actually achieving clean cuts with good tolerances. I’ve been experimenting with HSS tools for learning, but Fusion’s setup for that is a bit... strange.

Mach4 Setup

  • Machine configured as: "Lathe Diameter"
  • Tool 1: Tip placed at the center of the stock. On G54, measure XYZ, and in tool offsets, everything is zeroed.
  • Tool 2+:
    • Z → Face of stock (WCS)
    • X → Center of stock
    • In tool offsets, measure XYZ offsets
  • Post processor had to modify the startSpindle(), to add a hold of 1 second, to allow the change of spindle rotation and allow the motor to rest.
    if (typeof startSpindle.lastDirection !== "undefined" && startSpindle.lastDirection !== spindleDir) { writeBlock(mFormat.format(5)); // M5 - Stop spindle writeBlock(gFormat.format(4), "P1.0"); // G4 P1 - Dwell for 1 second } startSpindle.lastDirection = spindleDir;}

Fusion 360 Setup

Upper Tools:

  • Post Turret: 104
  • Setup: Orientation: 0°, Spindle Rotation: CW
  • Holder: If it’s a -R tool → Left Handed, if -L tool → Right Handed

Lower Tools:

  • Post Turret: 103
  • Setup: Orientation: 0°, Spindle Rotation: CCW
  • Holder: If it’s a -R tool → Left Handed, if -L tool → Right Handed

This is what’s working so far! Still a long road ahead, but progress is being made—one cut at a time. 💪

sketch

Read standalone post

2025/03/13 20:06 UTC
TLDRStill tweaking the barrel arbor on test #15, and while progress is happening, perfection is elusive. Even a 0.05-degree misalignment can cause big issues, but improvements have been made with innovative setup tweaks using a digital inclinometer. In watchmaking, every tiny adjustment counts, so it’s a journey of precision and patience. 🚀
Show more Show less

Barrel Arbor: Test #15 and Still Going!

The barrel arbor is one of the toughest parts to machine by hand. This is test #15 on the Elara with the 4th axis, and while I’m making progress, there’s still a long way to go before it’s perfect. 😅

Axis alignment has been a serious challenge. A small misalignment of just 0.05 degrees can cause a 0.125mm Z error at 20mm from center—enough to throw everything off. Right now, we’ve gotten it down to 0.065 degrees, which is great, but still not quite where it needs to be.

That 0.06mm difference may not seem like much, but in watchmaking, it absolutely is. Every micron counts when working at this scale, and even the slightest misalignment can affect fit, function, and aesthetics.

To align the 4th axis, I added a piece of aluminum to the 3-axis fixture, flattened it, and used that as a base for the digital inclinometer (with a precision of two decimal places). Then, I mounted the fixture onto the 4th axis and rotated it until it hit 0.00. This setup has improved accuracy significantly, but there's still a little room for refinement.

Precision at this level is no joke, but every test brings new insights. Onward to the next iteration! 🚀

sketch sketch

Read standalone post

2025/03/07 17:01 UTC
TLDRJust printed my first 3D case! 🎉 Thanks to Alexis for making it happen, it's amazing to see the design in real life. With two parts done, it’s all about refining from here—stay tuned for more updates!
Show more Show less

First 3D-Printed Case! 🎉

Wow—first case 3D print is here! Seeing the design come to life in physical form is incredible. Huge thanks to Alexis for setting up the resin print and making this happen! 🙌

And with two parts printed, I can finally start getting a real sense of how everything fits together. There’s still a lot to refine, but this is a huge step forward. 😊

Excited to keep iterating and improving—more updates soon!

sketch sketch sketch

Read standalone post

2025/03/04 15:42 UTC
TLDRTo improve air quality and reduce eye irritation, the author moved machines closer to a window for better ventilation after the Lathe3 incident. While hoping for fewer fumes, they're also crossing their fingers the noise doesn't bother neighbors. Bonus shoutout to Alexis for the assist! 🤞
Show more Show less

Machine Move for Better Air Quality

After the Lathe3 disaster, I needed to take my mind off things. At the same time, I’ve been dealing with some eye irritation from the coolant, so I figured it was the perfect moment to tackle another issue—air quality.

I decided to move the machines closer to the window to get better ventilation. Hopefully, this helps with the fumes and reduces irritation while I work. 🤞

Now, let’s just hope the neighbors don’t start complaining about the noise. 😅 Fingers crossed this setup works better for both my eyes and everyone around me!

😊


Thanks Alexis for all the help!

sketch

Read standalone post

2025/03/03 15:03 UTC
TLDRPlugged a NSCNC Lathe3 into the wrong voltage—220V—and it went boom! 💥 Now dealing with the frustration and damage, but grateful for NSCNC's support in fixing it. Remember: always double-check power requirements before plugging in new gear! ⚡
Show more Show less

Catastrophe! 😭

Oh no… absolute disaster. I was so excited to get started with the NSCNC Lathe3, but in my enthusiasm, I made a huge mistake. I connected it to 220V—and it wasn’t ready for it. Boom! 💥

Just like that, excitement turned into panic. I knew something was wrong the moment it happened, and now I’m left figuring out how bad the damage is. This hurts. 😞

Lesson learned the hard way—always double-check power requirements before plugging in new equipment. Hoping I can get this fixed soon and back on track. For now… just dealing with the frustration. 😩

Thankfully the guys at NSCNC where understanding and are guiding me on how to fix it

😭


sketch

Read standalone post

2025/02/28 12:03 UTC
TLDRThe NSCNC Lathe3 is here, promising a big leap forward in precision machining for projects requiring high accuracy, like balance staffs and screws. The arrival marks the beginning of a learning journey as the setup begins, with first tests and impressions to follow soon. If you’re into precision parts, this is something to watch for! 🎉
Show more Show less

NSCNC Lathe3 is Here! 🎉

Finally—my NSCNC Lathe3 has arrived, and I couldn’t be more excited! 😁 This marks a huge step forward in precision machining, and I can’t wait to start turning some high-accuracy parts.

Having a dedicated lathe opens up so many possibilities, especially for making components like balance staffs, screws, and other fine details that require tight tolerances. It’s going to be a steep learning curve, but I’m ready to dive in!

First up—getting everything set up and dialed in. Stay tuned for first tests and impressions soon! 🚀

😊


sketch

Read standalone post

NOSTR:

npub1nvhq9vgkpahlugwcf3jsnpaq5lj3w3rk6lknnvf9r8h8ft2ja2asaqcn2a
Copyright 2025 The bitcoin watchmaker